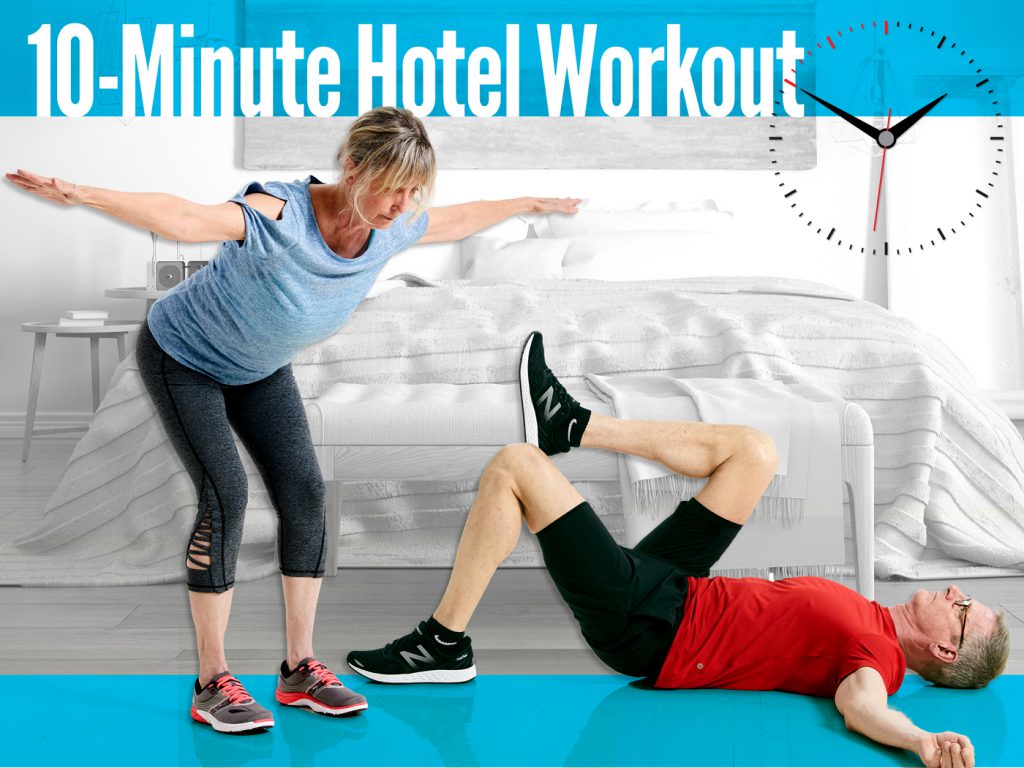
The 10-Minute Workout Every Traveler Needs
Relieve stiff joints, boost energy, and strengthen your whole body with this quick and simple plan.
Life is a journey to savor. Vacation travel, on the other hand, is rarely pleasant.
It can also wreak havoc on your body, from stiff joints caused by too much sitting to dehydration due to dry air on planes. Plus, if you’re stuck with a not-so-comfy hotel bed, you might feel like there’s no hope for redemption. But there is!
Esther Avant, a personal trainer and nutrition coach based in Hawaii, designed the quick workout below to help alleviate aches and pains that result from stressful travel. The moves stretch and strengthen your entire body, with an emphasis on the lower back and hips since those areas tend to get especially tight while traveling, Avant says.
You can do it right in your hotel room using a bed or desk, towel in place of a mat, and water bottle in place of a dumbbell. Avant even arranged the workout to minimize time spent getting up and down from the floor, so you can knock it out and get back to enjoying your vacation. And when you do, you’ll have more energy, a calmer mind, and a stronger body.
How It Works
After the warmup, do each exercise in Circuit 1 in order. Repeat the full circuit one more time for two rounds total, and then move on to Circuit 2. Do two rounds of the second circuit, and then finish your workout with the cooldown.
As with any workout, safety always comes first. If an exercise feels too hard, you can modify it to make it easier, or you can skip it and just do the moves that work for you.
The Warmup
1. Cat-Cow Stretch
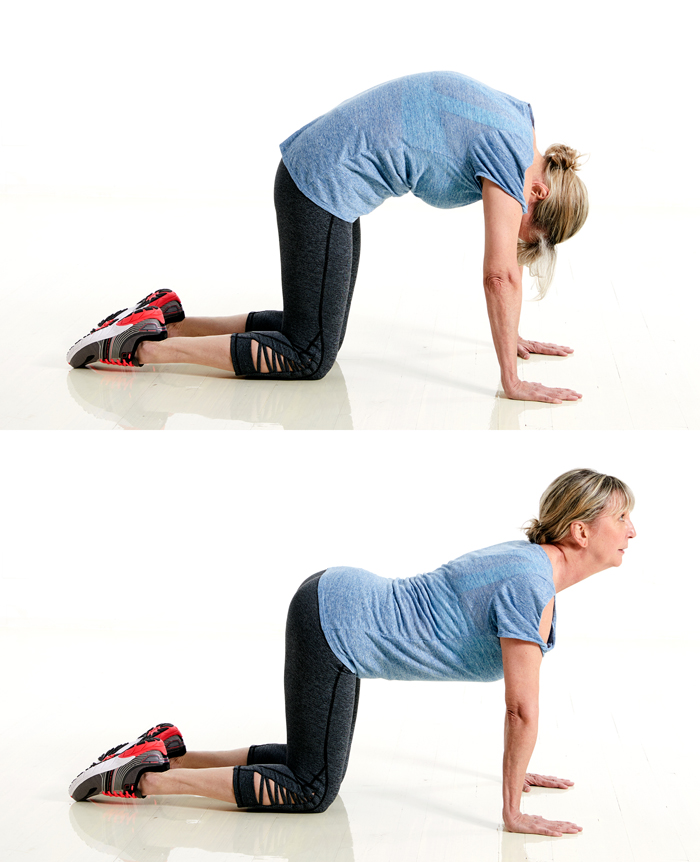
Start on all fours with your hands below shoulders and knees below hips. You can use a towel in place of a mat. Slowly round your back up toward the ceiling (like a cat) while tucking your chin toward your tailbone. Then reverse the movement by arching your back (think about a cow) while lifting your hips and head. Do 10 reps total (five with back rounded, five with back arched). Cautionary note: This move may not be recommended if you have osteoporosis.
Make it easier: Try it standing. Stand with your feet hip-width apart, lean forward at your waist, and place your hands on a bed, desk, or chair. Slowly alternate between rounding and arching your back.
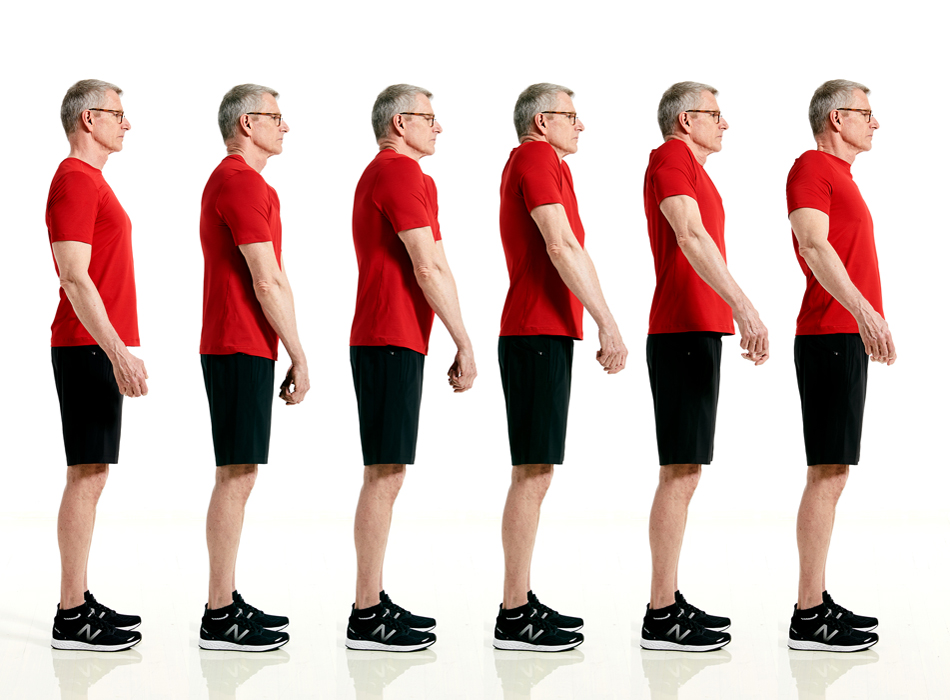
2. Torso Rotation
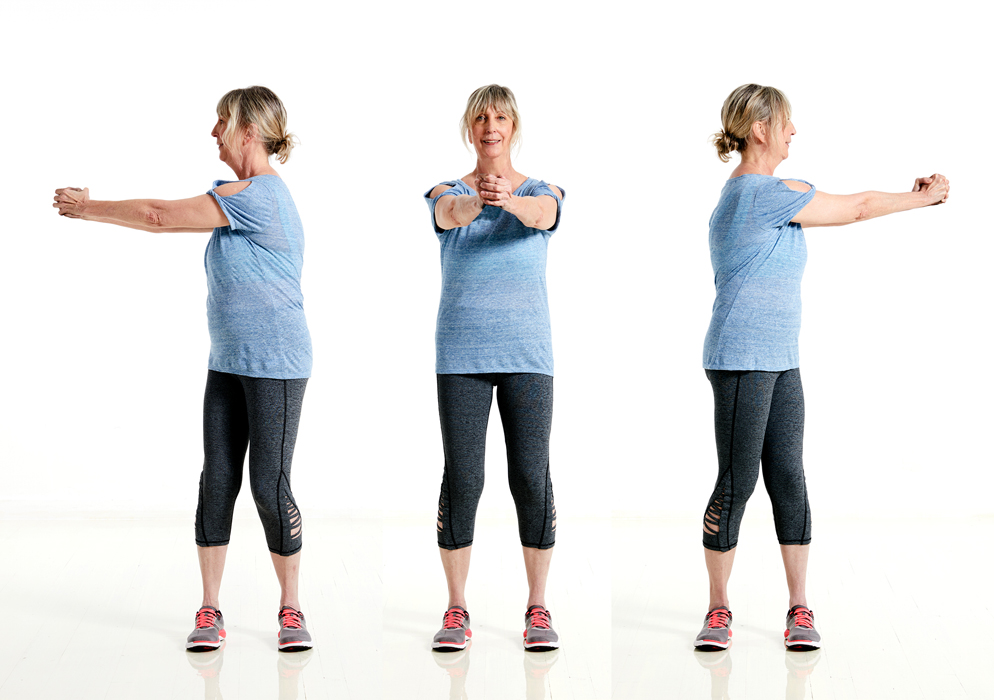
Stand with your feet hip-width apart and knees slightly bent. Stretch your arms straight out in front of you, and gently clasp your hands together. Slowly rotate your torso to the right, twist back to the center, and then rotate to the left. Make sure to keep your shoulders down away from your ears and engage your core. Focus on turning from your waist, not your arms. Do 10 reps total (five per side). Cautionary note: This move may not be recommended if you have osteoporosis.
3. Shoulder Roll
Stand tall with your feet hip-width apart and arms by sides. Roll your shoulders forward, up, back, and down as smoothly as possible. After five reps, reverse direction. Do 10 reps total.
Circuit #1
Do eight reps of each exercise in order, and then repeat entire circuit.
1. Modified Pushup
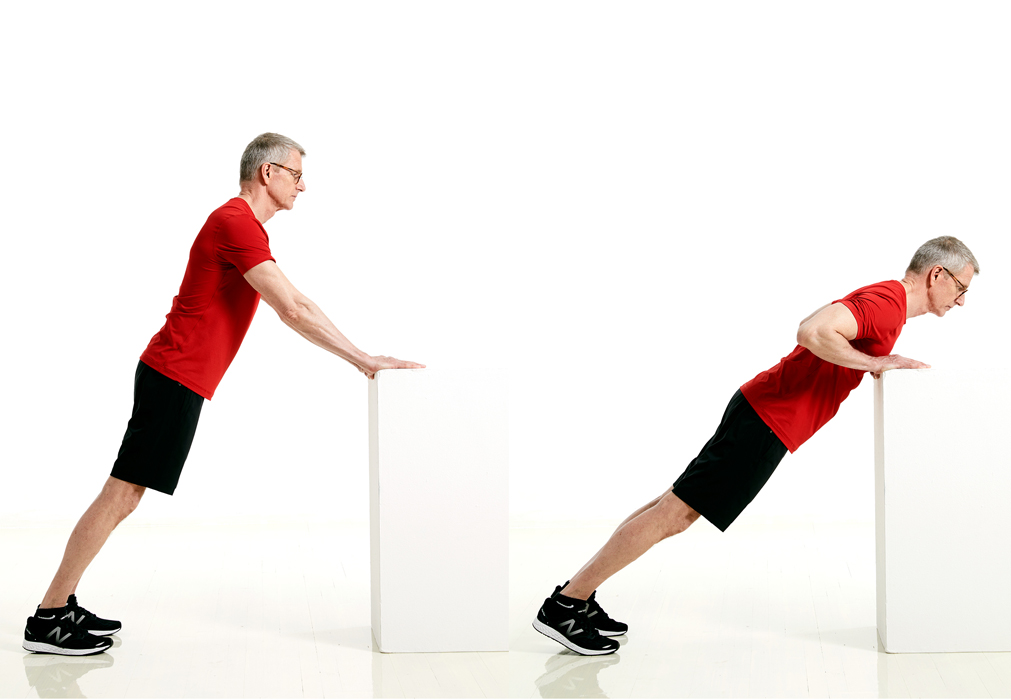
Stand facing a desk, dresser, or wall. The taller the object or the more upright you are, the easier the move. Place your hands on the edge, slightly wider than shoulder-width apart. Move your feet back until you are at a comfortable angle, keeping arms straight and perpendicular to your body. Bend your elbows to lower your chest toward the object, pause, and then press back up to straighten your arms. Keep your body straight throughout the entire movement, making sure to engage your abs and squeeze your rear.
2. Hip Hinge
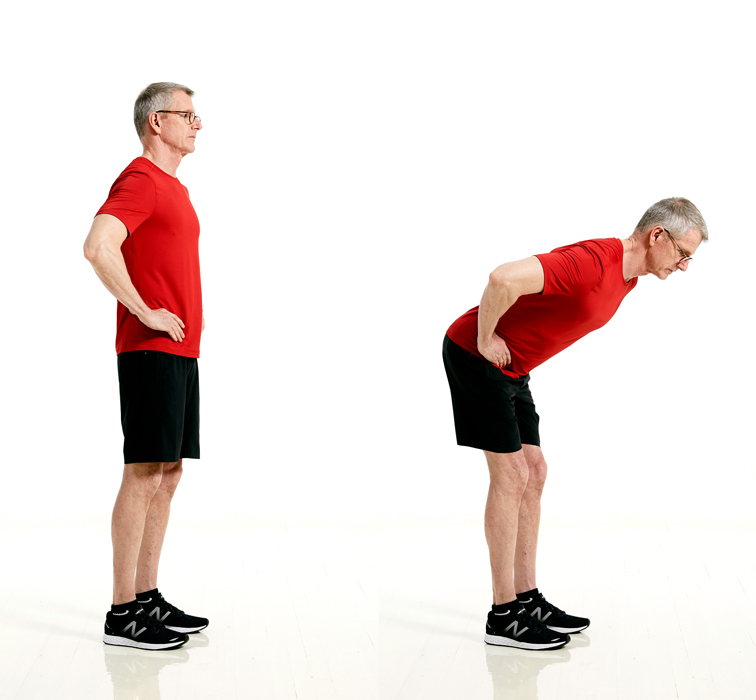
Stand with your feet hip-width apart, knees slightly bent, and hands on hips. With your weight in your heels, push your hips back behind you, and hinge forward. Continue bending at the hips until your torso is at about 45 degrees, or halfway between upright and parallel to the floor. Squeeze your rear, push your hips forward, and slowly raise your torso back to the starting position.
3. Triceps Extension
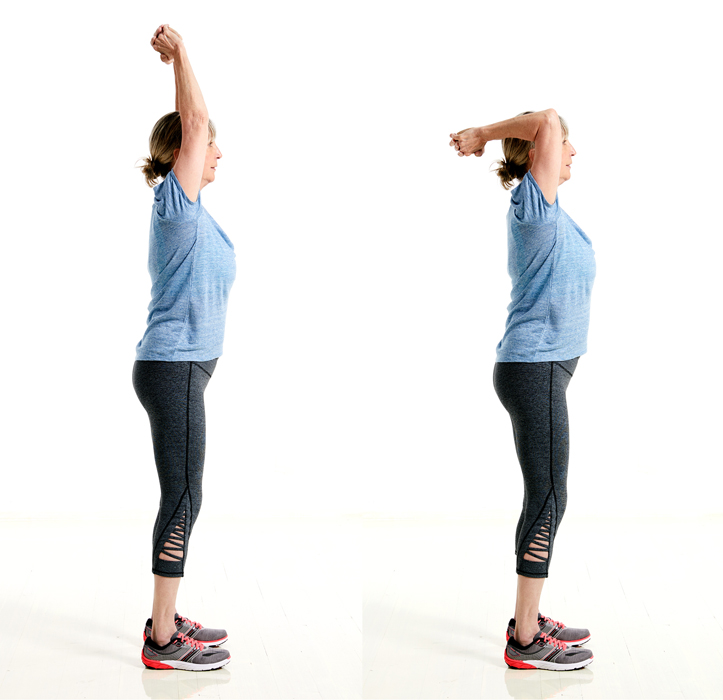
Stand with your feet hip-width apart and knees slightly bent. Hold the end of the water bottle with both hands, or skip the water bottle and simply clasp your hands together. Extend your arms toward the ceiling so your upper arms are by your ears. Your neck should be in line with your back, and keep your shoulders down and back. Keeping your upper arms steady, bend your elbows to lower your hands behind your head. Pause, and then slowly straighten to return to the starting position.
Or try an alternate exercise: If you can’t lift your arms above your head or your doctor has advised against overhead exercises, try the triceps kickback. Start in a hip hinge position, with your feet hip-width apart, knees slightly bent, and torso bent at a 45-degree angle. Hold a water bottle in each hand like a dumbbell, or simply make a fist. Bend your elbows so your upper arms are in line with your torso. Keeping your upper arms steady, gently push your hands back to straighten your arms. Pause, then bend your arms back to the starting position.
4. Seated Knee Raise
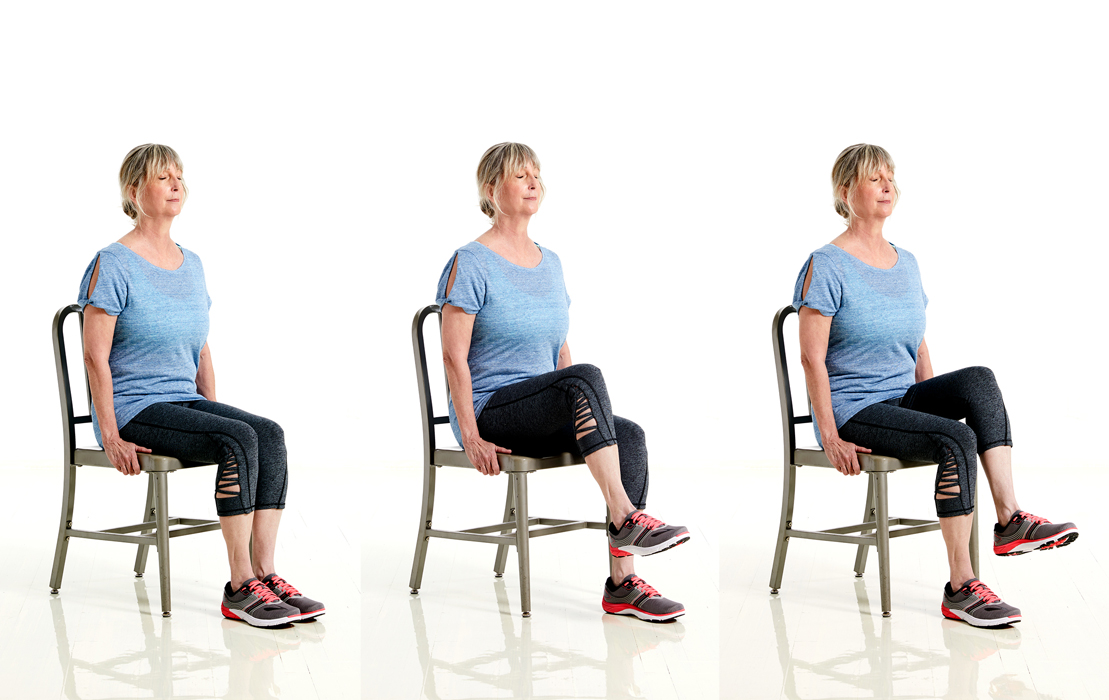
Sit on the edge of a chair with your feet together and below your knees, holding onto the sides of the chair with your hands. You can do this exercise with your eyes open. Or for deeper concentration and a balance challenge, try it with your eyes closed. Bracing your core and keeping the bend in your knee, slowly lift your right leg so that your foot hovers about six inches off the floor. Slowly release back down and repeat for eight reps, then switch to lift your left leg.
Circuit #2
Do eight reps of each exercise in order, and then repeat entire circuit.
1. Clamshell

Lie on one side with your legs stacked and knees bent at a 45-degree angle. Keeping your hips steady and your top foot down, lift only your top knee as high as you can. Lower your top knee back to the starting position. Repeat for eight reps, then switch sides.
2. Standing Arm Lifts
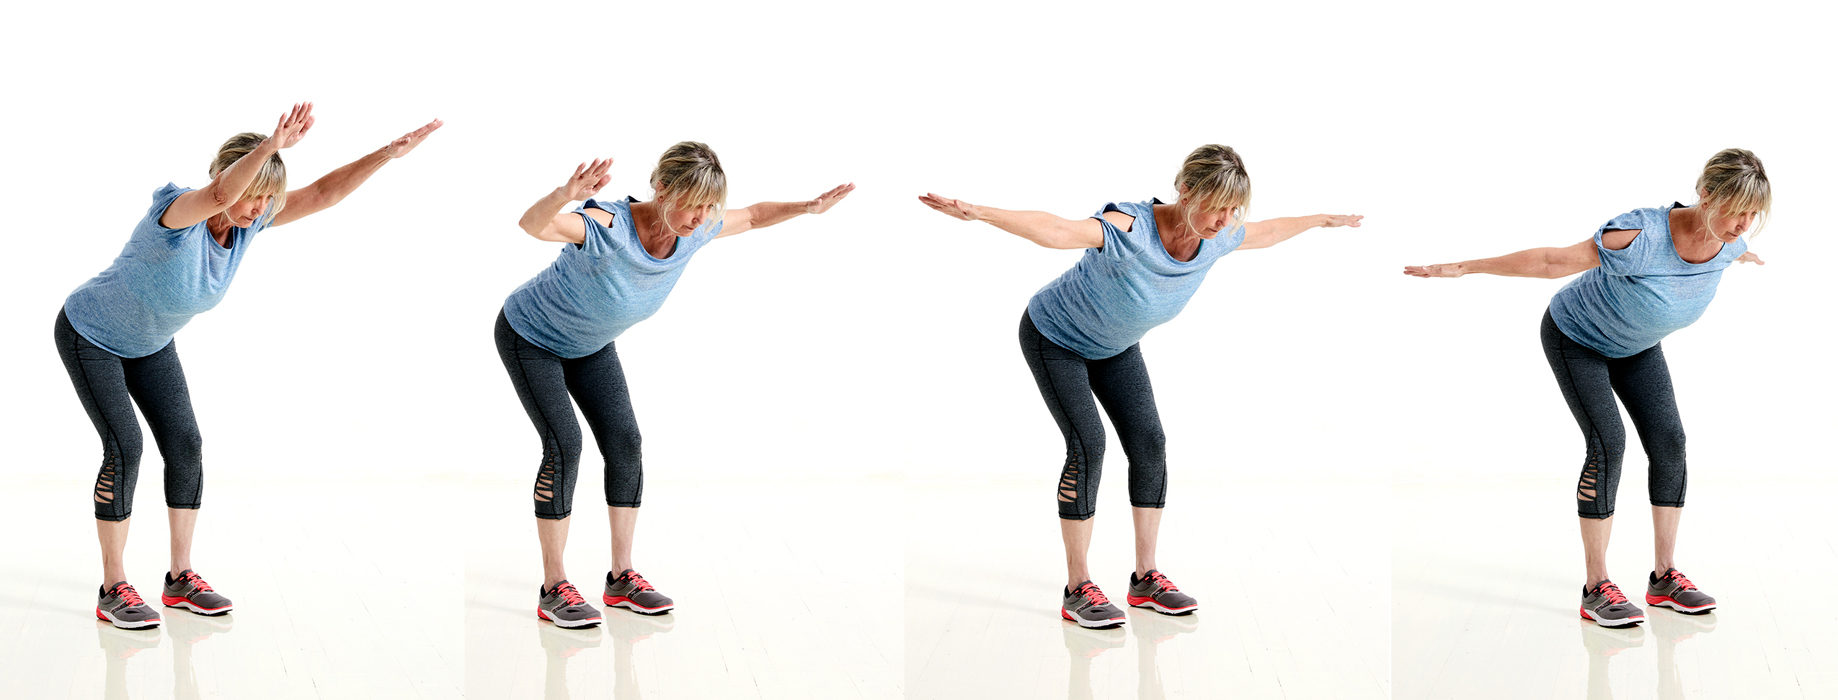
Start in a hip hinge position, with your feet hip-width apart, knees slightly bent, and torso bent at a 45-degree angle. With palms facing down, extend your arms from your shoulders to form a Y. Next, bend your elbows and pull them back so that your upper arms are in line with your shoulders. Next, keeping your upper arms steady, straighten your arms to make a T. Finally, keeping your arms straight, squeeze your shoulder blades and gently push your arms back.
Make it easier: If you have flexibility challenges, do just the first three positions (Y, arms bent in, T). Focus on good form and squeezing your shoulder blades.
Subscribe to our newsletter
It's quick and easy. You could be one of the 13 million people who are eligible.
Already a member? Click to discover our 15,000+ participating locations.
Follow Us
3. Dead Bug
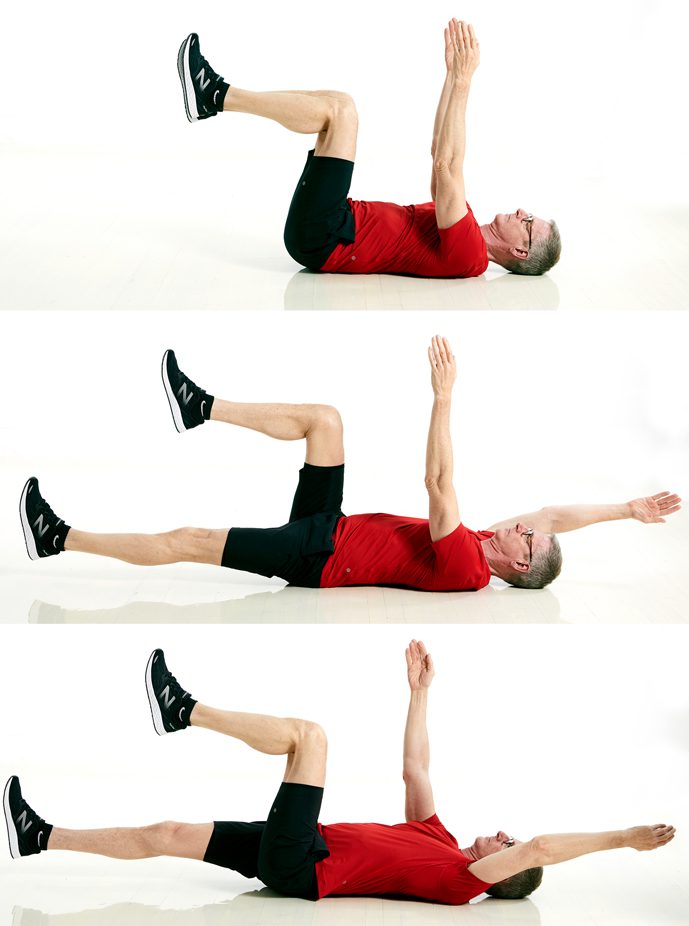
Lie on your back with knees bent and feet flat on the floor. Brace your abs, and raise your bent legs up so that your knees are stacked over your hips, keeping a 90-degree bend in your knees. With palms facing each other, bring arms up to point toward the ceiling. Straighten your left leg and bring it toward the floor (try not to let it touch). At the same time, bring your right arm back toward the floor (try not to let it touch). Bring arm and leg back to the starting position. Repeat with your right leg and left arm to complete one rep. Alternate sides for eight reps total.
4. Supine Reverse March
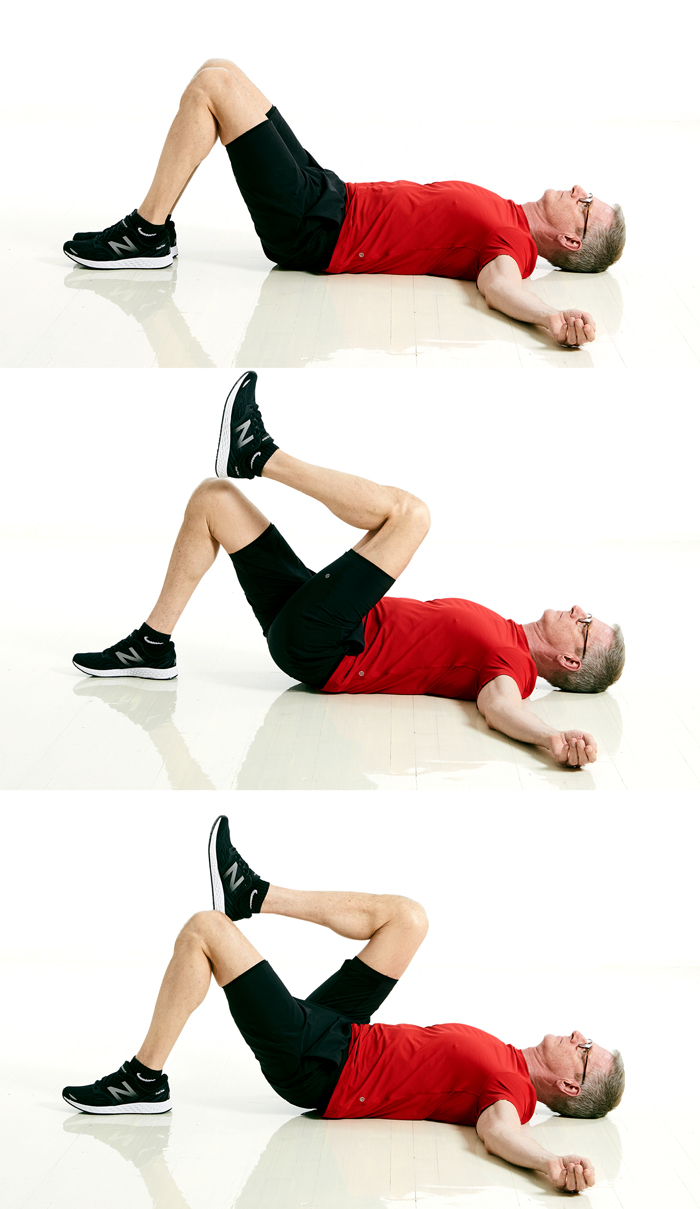
Lie on your back with knees bent and feet flat on the floor. Place your arms out at your sides with palms up so you’re making a T. Keeping your shoulders back and the bend in your knee, slowly lift your left foot off the floor until it’s by your right knee, or as far as comfortable. Pause here for a few seconds before slowly lowering down. Do eight reps, then repeat with your right foot.
The Cooldown
1. Cobra Pose
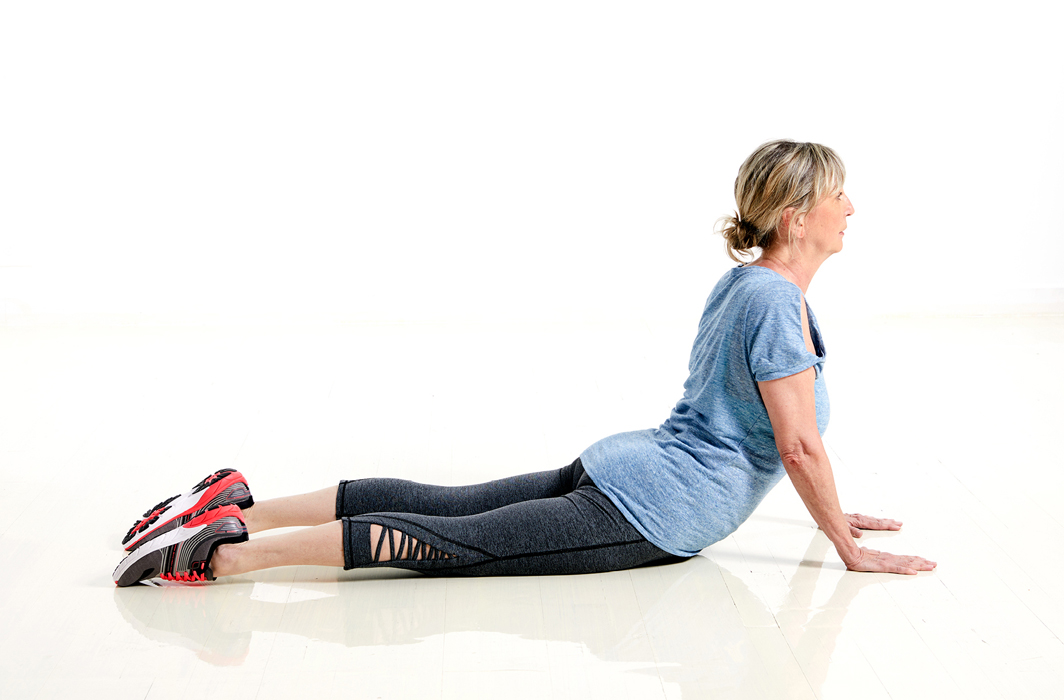
Lie on your stomach with legs straight, feet pointing out behind you, and your hands on the floor below shoulders, elbows bent. Keeping your lower body steady, squeeze your rear and straighten your arms to lift your chest off the floor. Only lift up as far as comfortable, even if it’s just a few inches. Gaze in front of you. Hold for 15 seconds, and then bend your elbows to return to the starting position.
Make it easier: Try it with arms bent instead of straight. Lie on your stomach with legs straight, feet pointing out behind you, and your elbows on the floor below shoulders. Keep your forearms on the floor as you lift your chest up.
2. Bird Dog
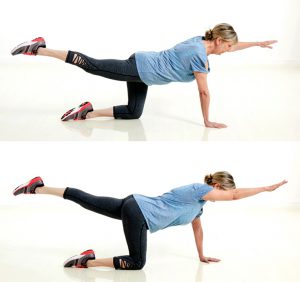
Start on all fours with your hands below shoulders and knees below hips. Engage your abs, keep your spine neutral, and gaze down or slightly forward. Lift your left arm and extend your right leg until they are in line with the rest of your body. Lower back down, and repeat for five reps total. Switch sides to lift your right arm and extend your left leg.
Make it easier: Keep your hands on the floor, and only extend your leg.
3. Cobra Pose
Perform cobra pose again, holding for 15 seconds.
Check Your SilverSneakers Eligibility Instantly
SilverSneakers gives you free, unlimited access to more than 15,000 gyms and fitness centers across the nation, plus classes and tools designed to keep older adults strong and independent. Check your eligibility instantly here.
Note: The exercises in this workout may be different or more advanced than those you’ll experience in a SilverSneakers class. Please consult your physician before beginning a physical activity program to make sure it’s safe for you.