The Best Lower-Abs Exercises for Older Adults
Tighten this common trouble zone and strengthen your whole core at once with these smart moves.
The lower abdominals are notoriously a hard-to-target zone. Many popular core exercises such as crunches, wood chops, and side bends don’t always engage the muscles below your belly button as intensely as the ones in your upper torso.
But as you probably know by now, a strong core is essential for staying mobile and independent for the long haul—and that includes those elusive lower abs.
“Think of the core as the foundation of all movement and the main transmitter of energy and force,” says Bethanie Bayha, D.P.T., an orthopedic clinical specialist and clinic director at Real Rehab in Seattle, Washington. Maintaining core strength is important at any age, but it’s especially critical as we get older, she says. “We can get away with a lot more when we’re younger, because strength in the arms and legs can compensate for a weak core. But over time, we tend to lose muscle strength in these areas as well, so it becomes much more evident if we’re weaker in the trunk and can’t move as well.”
That’s why it’s so important to incorporate exercises into your routine that strengthen all the muscles of your core, from your lats and traps to your glutes and pelvic floor. The six exercises below do exactly that, which extra emphasis on the lower abs.
How to Use These Lower-Abs Exercises
To make sure your lower abs get the attention they need, pick one or two of the following exercises to add to your normal strength routine. You can keep rotating which exercises you do to keep things interesting and challenging.
Another option: Pick a few exercises to do as a warmup for cardio, Bayha suggests. For example, if you go for a walk every day, do two or three of these abs exercises beforehand to wake up your core and prepare for the work ahead.
Instead of completing a set number of reps, Bayha recommends using time. Start by doing each exercise for 30 seconds. When that feels easy to you, try 45 seconds. If 30 seconds is too difficult, scale it back to 10 to 15 and slowly add time as you get stronger and feel more comfortable doing these exercises.
Ready to get started? Here’s how to perform each movement. As always, safety is key. The exercises here may be different or more advanced than those you’ll experience in a SilverSneakers class. If you have a chronic condition (including osteoporosis) or an injury, talk to your doctor about how you can exercise safely.
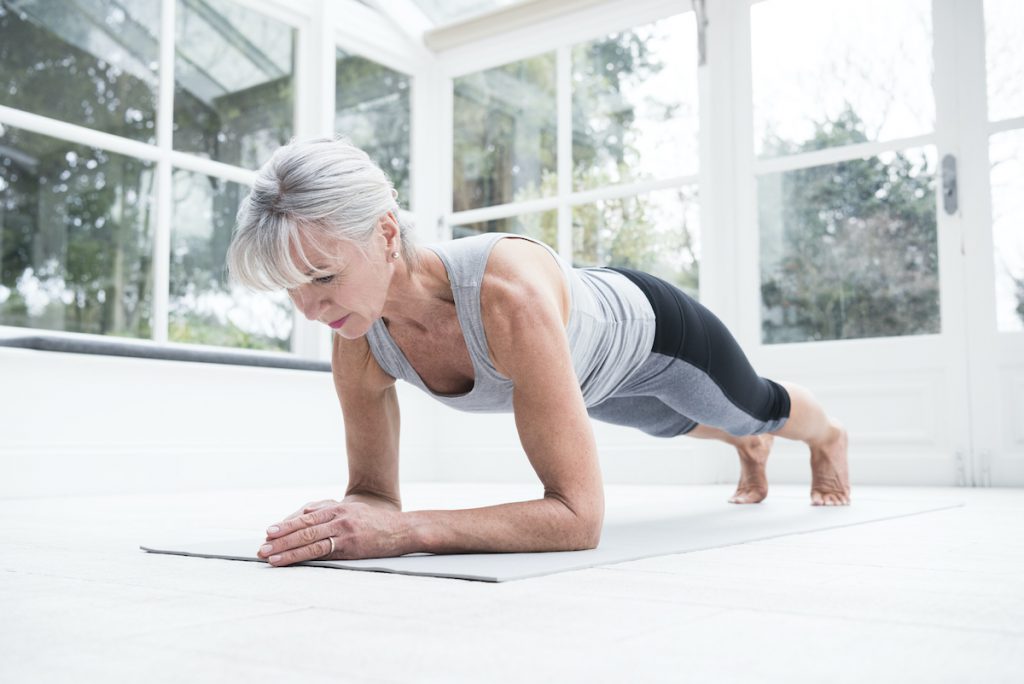
Lower-Abs Exercise #1: Bent-Arm Plank Tuck
Plank works your entire core, but you can make it hit your lower abs a bit more by adding a tucking motion, Bayha says. The movement is small, but you’ll feel the added challenge quickly.
How to do it: Lie on your stomach with your elbows directly underneath your shoulders, forearms flat on the floor, and legs extended behind you. Focus your eyes between your hands.
From here, lift your hips toward the ceiling until your body forms a straight line from head to ankles. Squeeze your glutes, brace your core as if you’re about to be punched in the gut, and pinch your shoulder blades down and back so they’re away from your ears.
Tuck your pelvis, thinking about bringing your pubic bone toward your nose. Hold for one to two counts, then untuck the pelvis and repeat. Continue tucking and untucking, keeping the core and glutes engaged, for 30 seconds or as long as you can maintain good form.
Lower-Abs Exercise #2: Body Saw
By adding some forward and backward movement to your plank, you’ll recruit more of the lower abdominals. Bayha suggests actively tucking your pelvis under slightly to further engage the low abs.
How to do it: Lie on your stomach with your elbows directly underneath your shoulders, forearms flat on the floor, and legs extended behind you. Focus your eyes between your hands.
From here, lift your hips toward the ceiling until your body forms a straight line from head to ankles. Squeeze your glutes, tighten your core, and pull your shoulder blades down and back so they’re away from your ears. Tuck your pelvis slightly, thinking about bringing your pubic bone toward your nose, to better engage your lower abs.
Keeping your core tight and tucked, shift your entire body forward so that you’re on the tips of your toes and your shoulders move towards your wrists. Then, glide your body back to the starting position.
Continue this “saw” motion, shifting forward and back, for 30 seconds or as long as you can maintain good form. If you start to feel any pain in your lower back or your hips begin to sag, that’s a sign your form is breaking down and you should stop.
Lower-Abs Exercise #3: Bent-Arm Plank with Alternating Knee Tap
When you’re holding the rest of your core tight and only moving your legs, the lower portion of your abdominals must work harder to keep the pelvis in place and ensure the movement only comes from the legs. That’s why this exercise is so effective for the lower abs.
How to do it: Lie on your stomach with your elbows directly underneath your shoulders, forearms flat on the floor, and legs extended behind you. Focus your eyes between your hands.
From here, lift your hips toward the ceiling until your body forms a straight line from head to ankles. Squeeze your glutes, tighten your core, and tuck your pelvis slightly, thinking about bringing your pubic bone toward your nose.
Bend one knee until it taps the floor, or as close as you can get. Then, extend it back out. Repeat with the other knee. Continue alternating, bending one knee at a time, for 30 seconds or as long as you can maintain good form.
Lower-Abs Exercise #4: Half Dead Bug
Dead bug typically involves moving both your arms and legs. By holding the arms stationary and only moving your legs, you can better isolate the lower abs. If you want more of a challenge, hold a light weight in each hand.
How to do it: Lie on your back with knees bent and feet flat on the floor. Raise your bent legs up so that your knees are stacked over your hips, keeping a 90-degree bend in your knees. Brace your core to press your low back into the floor; make sure to maintain this flat-back position throughout the entire exercise. With your palms facing each other, bring arms up to point toward the ceiling.
Subscribe to our newsletter
It's quick and easy. You could be one of the 13 million people who are eligible.
Already a member? Click to discover our 15,000+ participating locations.
Follow Us
Without moving your arms, straighten your left leg and bring it toward the floor (try not to let it touch). Pause, then bring your leg back to the starting position. Repeat on the opposite side with right leg.
Continue alternating legs, making sure to keep your core engaged and back flat against the floor, for 30 seconds or as long as you can maintain good form.
Lower-Abs Exercise #5: Glute Bridge with Roll Down
The key to this exercise is to articulate the spine, slowly rolling down one vertebra at a time, Bayha says. This helps you focus on using the lower abdominals instead of letting your legs or back muscles take over.
How to do it: Lie on your back with knees bent, feet flat on the floor about hip-width apart, and heels a few inches away from your buttocks. Press your arms into the floor for support, and brace your core to minimize the arch in your lower back.
From here, push through your heels and squeeze your glutes to lift your hips up until your body forms a straight line from your knees to shoulders. Pause, then slowly roll back down, lowering one vertebra to the floor at a time, starting with your back and ending with your hips. Repeat the movement for 30 seconds, or as long as you can maintain proper form.
Lower-Abs Exercise #6: Standing March
To do this move right—which involves lifting one leg at a time without shifting the position of your pelvis—you have to engage your lower abs, Bayha says. A nice bonus: This is a great exercise for working on your balance.
How to do it: Stand tall with your feet hip-width apart. If needed, hold on to the wall or a sturdy piece of furniture for balance. As you get stronger, perform the move without holding on to anything.
From here, lift one knee until your thigh is parallel to the floor (or as close to parallel as you can go) while keep your torso straight and avoiding any leaning. Return your foot to the floor and immediately lift the other knee.
Continue alternating, or marching in place, for 30 seconds.
Take Your Favorite SilverSneakers Classes Online!
SilverSneakers members can access live fitness classes and wellness workshops through SilverSneakers LIVE. See the latest schedule and RSVP for classes here.
Not a member? If you have a Medicare Plan, it may include SilverSneakers—at no additional cost. Check your eligibility instantly here.