Strength Training Exercises for Seniors: Everything You Need to Know
Building muscle isn’t as hard as you may think — and the benefits of strength training will help keep you strong for years to come.

If your workout doesn’t include strength training, you’re really missing out. Strength training helps:
- Ward off age-related muscle loss
- Keep your bones strong
- Boost mobility
- Prevent falls
- Fight depression
- Slow cognitive decline
- And more
But if you didn’t perform many strength training workouts in your younger years (and even if you did), hitting the weight room now can be intimidating. Don’t sweat it! This guide will help you approach strength training in a safe, effective, and fun way that will keep you stronger for life.
Stay active, have fun, get fit — with SilverSneakers! Classes and events are happening right now at participating gyms, online through SilverSneakers LIVE, and at community centers near you. Activate your free online account to get started.
Strength Training: Master the Basics First
If you’re new to strength training, which is also referred to as resistance training, don’t stress about lifting dumbbells or using weight machines at first. Instead, focus on performing exercises using your bodyweight so you can learn proper form and build a base level of strength.
It’s wise to get a bit stronger before adding extra challenges to the mix, recommends Gavin McHale, a certified exercise physiologist based in Winnipeg. Starting with bodyweight workouts can prevent injuries and help you build confidence.
McHale says when performing basic bodyweight movements, work up to performing three sets of 10 to 15 repetition, or reps. When that starts feeling easy, that’s your cue to progress to weighted workouts.
Work in Smaller Hand Weights Next
When you’re ready to move on from bodyweight exercises, start with the lightest dumbbells available at your gym. When those stop feeling challenging, bump up the heaviness from there.
Recommended reading: How to Choose the Right Weight for Strength Training
Depending on the strength-training moves you’re doing, resistance bands can also be great alternatives to traditional free weights like dumbbells. Resistance bands are more flexible and less expensive.
If you need help perfecting your form, ask your gym about working with a personal trainer, recommends Tiffany Chag, C.S.C.S., a strength coach at the Hospital for Special Surgery in New York City. All exercisers, no matter their age or fitness level may be, can benefit from one-on-one training sessions.
Commit to Strength Training Regularly
The Centers for Disease Control and Prevention recommends that older adults should strength train at least twice a week. You should do these workout sessions on non-consecutive days, but it’s perfectly fine to do aerobic exercise on the days in between.
Strength training might take some easing into, especially if you’re new to this kind of physical activity. “If you’ve never done resistance training before, keep day one short and sweet,” Chag says. “Aim for 10 to 15 minutes. Then see how you feel. If you’re achy afterward, wait until the soreness is gone before your next session.”
While muscle soreness isn’t a bad thing, exercise recovery tends to take longer as we get older. Giving your body ample time to recover from each workout will ensure you get the most benefits possible.
The Best Strength Exercises for Older Adults
Strengthening your body’s largest muscle groups through functional movements, like these five exercises will improve your performance at everyday tasks such as climbing stairs, carrying groceries, and playing with your grandkids. As you become stronger, you’ll be able to add weight and increase the number of repetitions.
You can perform these exercises one of two ways:
- Individually: Aim for three sets of 10 to 15 reps.
- As a circuit: Do 10 to 15 reps of the first exercise, then the second exercise, and so on. Once you’ve completed all five exercises, that’s one round. Do three rounds total.
Ready to get started? Here’s how to perform each movement. As always, safety is key. The exercises here may be different or more advanced than those you’ll experience in a SilverSneakers class. If you have a chronic condition, an injury, or balance issues, talk to your doctor about how you can exercise safely.
Exercise #1: Squat
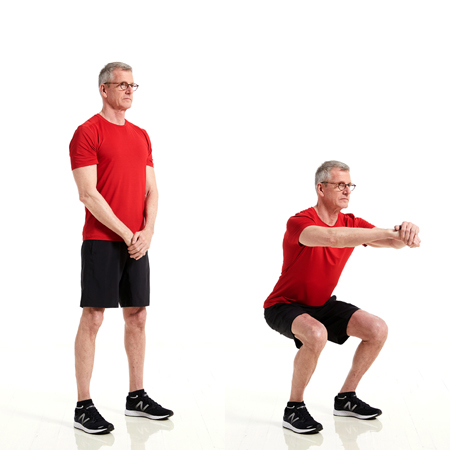
Stand tall with your feet shoulder- to hip-width apart. Hold your arms straight out in front of you at shoulder level, and brace your core. This is your starting position.
From here, push your hips back, and bend your knees to slowly lower your body into a squat, not letting your knees cave in as you do so. Pause, then push through your heels to slowly to return to your starting position. That’s one rep. Aim for 10 to 15 reps.
Make it easier: Stand in front of a chair. Keeping your weight on your heels, bend your knees to slowly lower your body to the chair with control. As soon as your rear touches the seat, push through your heels to return to standing. Still too challenging? Check out more tips in our beginner’s guide to the squat.
Make it harder: Hold a dumbbell or medicine ball at your chest throughout the exercise.
Exercise #2: Incline Pushup
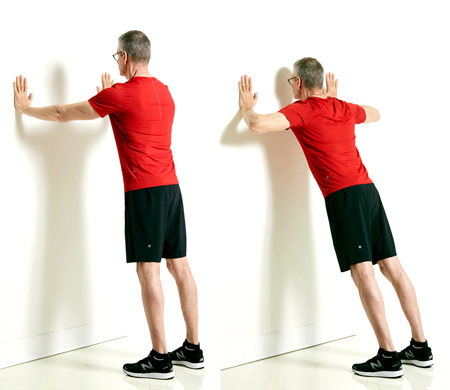
Stand facing a table, dresser, or wall. The taller the object or more upright you are, the easier the move. Place your hands on the surface or edge, slightly wider than shoulder-width apart. Move your feet back until you are at a comfortable angle, keeping your arms straight and perpendicular to your body.
Bend your elbows to slowly lower your chest toward the object, pause, and then press back up to straighten your arms. Keep your body straight throughout the entire movement, making sure to engage your abs and squeeze your rear. That’s one rep. Aim for 10 to 15 reps.
Make it harder: As you get stronger, reduce the incline. If pushups using a wall start to feel easy, try them using a countertop. As your upper body gets stronger, try them using a bench, and then finally the floor.
Exercise #3: Seated Row
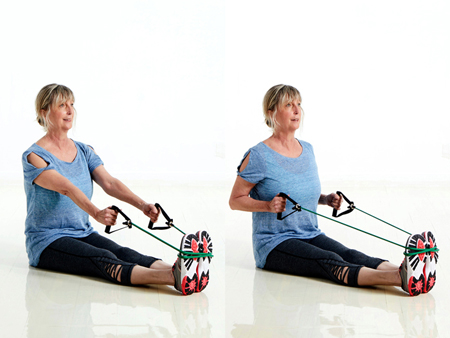
Sit with your legs extended, and place the center of a resistance band securely behind the arches of your feet. If you’re using a long exercise band, you can loop it around your feet twice so that, when you hold the band, it’s taut. Grab the ends of the band with both hands, arms extended and palms facing each other.
Sitting tall, pull your shoulder blades down and back, and bend at the elbows to slowly pull the band toward your core. Drive your elbows straight back; do not let them flare to the sides. Slowly reverse the movement to return to starting position. That’s one rep. Aim for 10 to 15 reps.
Make it easier: If you can’t easily get down on the floor, try the seated row in a chair or the seated row machine.
Subscribe to our newsletter
It's quick and easy. You could be one of the 13 million people who are eligible.
Already a member? Click to discover our 15,000+ participating locations.
Follow Us
Make it harder: If you want to try bent-over rows with dumbbells, talk to your doctor to make sure your lower back is healthy enough for the movement.
Exercise #4: Stationary Lunge
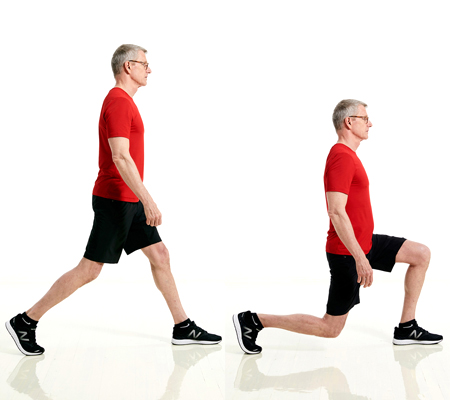
Stand tall with your arms down at your sides. Step back with your right foot, placing the ball of your foot on the ground with your heel lifted.
From this staggered stance, bend your front (left) knee to slowly lower your body as far as comfortable. Allow your back knee to bend as well until it hovers a few inches above the floor, but keep your weight pressed into your front heel. Draw your lower belly in, and lift your chest.
Pause, then press through your front foot to raise your body back to standing. That’s one rep. Aim for 10 to 15 reps on each side.
Make it easier: Place your hands on the back of a sturdy chair or a wall for support. Troublesome knees? You can lean forward slightly from the waist to reduce stress on your joints or check out more ways to make lunges easier on your knees.
Make it harder: Bodyweight lunges are challenging for most older adults, but you can hold light weights in your hands to make this move more difficult.
Exercise #5: Dead Bug
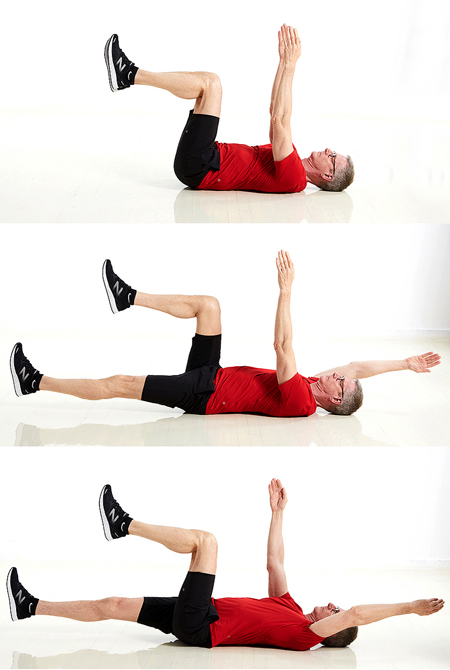
Lie on your back with your knees bent and feet flat on the floor. Raise your bent legs up so that your knees are stacked over your hips at a 90-degree angle. Brace your core to press your low back into the floor. Make sure to maintain this flat-back position throughout the entire exercise. With your palms facing each other, bring your arms up to point toward the ceiling.
Straighten your left leg and bring it toward the floor (try not to let it touch). At the same time, bring your right arm back toward the floor (try not to let it touch). Pause, then bring your arm and leg back to the starting position. Repeat on the opposite side with right leg and left arm extended. That’s one rep. Aim for 10 to 15 reps.
Make it easier: Keep your legs bent as you lower them toward the floor.
Activate Your FREE SilverSneakers Online Account
Get hundreds of free SilverSneakers On-Demand videos and stay in touch with us by creating your free online account. You don’t have to be a SilverSneakers member to get on-demand workout videos, health and fitness tips from SilverSneakers, and more.
SilverSneakers members can go to thousands of nationwide gyms and fitness locations, plus take SilverSneakers LIVE online classes led by specially trained instructors and designed for all fitness levels and abilities – at no additional cost. If you have a Medicare Advantage plan, it may include SilverSneakers. Check your eligibility here.
Already a member? Get your SilverSneakers member ID, search for locations near you, and all the health and wellness resources you need by logging in to your online member account here.