9 Best Sciatica Exercises: How to Ease the Pain
Find relief and stay active with these simple sciatica stretches and strength moves.

For up to 40% of Americans, at one time or another, sciatica becomes a literal pain in the butt. Luckily, there are some strategic sciatica exercises that can ease the pain, numbness, tingling, and weakness that sciatica sends shooting through your legs.
Sciatica is a blanket term for any pain that originates from the sciatic nerve — the longest nerve in the body, running from the low back through the buttocks and down the legs. Sciatica occurs when the nerve roots become pinched or aggravated.
Some people with sciatica may have only minor discomfort, but severe cases can even impact the bowels or bladder. Read on to find out what causes the condition, the symptoms, and the best sciatica exercises to treat sciatica and bring much welcome relief.
Add SilverSneakers to your wellness routine! Classes and events are happening daily at participating gyms, online through SilverSneakers LIVE, and at community centers near you. Activate your free online account to get started.
Causes of Sciatica
According to Brian Jones, D.P.T., a physical therapist at the Hospital for Special Surgery in New York City, some of the most common causes include:
- Herniated discs — The result of bulging in the cushioning between the bones in your spinal column)
- Stenosis — Narrowing of the spine
- Bone spurs — Boney growths that develop in the spine
- Piriformis syndrome — This happens when the piriformis muscle in your butt is a little too tight and puts pressure on the sciatic nerve. It causes pain and numbness that radiates down the back of your leg.
If you’re not familiar with the piriformis, it’s a small muscle that’s tucked away behind the gluteus maximus.
Inactivity or lengthy bouts of sitting, along with obesity and type 2 diabetes, can also contribute to issues anywhere along the sciatic nerve.
Recommended reading: Sciatica Pain, Explained
Symptoms of Sciatica
Whatever the root cause, if you’ve been diagnosed with sciatica, you know the pain very well: Sometimes, it’s dull and achy. Other times, sharp muscle spasms can take your breath away or cause your leg to give out.
The pain might make you think that curling up with a heating pad is a better fix than exercise. Think again.
“Exercise can treat and eliminate the pain,” Jones says. In fact, physical therapy was as effective as surgery at managing sciatica over the long term, according to a review in the European Spine Journal.
Jones explains that exercise brings relief by limiting sciatica’s aggravating factors, such as friction or compression between muscles and movement dysfunction. Exercise also helps people move better around the pain, or despite it.
“The word ‘cure’ may imply changing what is present on an x-ray or MRI, and that’s not possible,” he says.
After all, if you have a herniated disc, stretching and strengthening exercises aren’t going to pop it back in place.
“But it is also not necessary,” he continues, explaining that with sciatica, the correlation between imaging and symptoms is pretty loose.
So even if that herniated disc is never corrected, you can still radically reduce pain with the right exercises.
Recommended FREE SilverSneakers On-Demand Class: Sciatica Pain Exercises: Simple Sciatica Pain Relief for Seniors
The Best Stretches and Exercises to Treat Sciatica
As handy as it would be for certain stretches and exercises to ease sciatica across the board, the reality is that everyone experiences sciatica differently, and that what helps one person might actually hurt another.
Listen to your body, and don’t try to push through anything that doesn’t feel right for you, Jones says. Exercising through pain will result in worsening symptoms.
It’ll also likely throw off your form, which will raise your risk of exercise-related injury.
“Rather than pushing through, it’s important to figure out what motions improve your pain and do more of that, and what motions worsen your pain, so you can temporarily avoid those,” he says.
Over time, after your symptoms subside, you may be able to gradually add back in those previously irksome movements without pain.
To aid your quest for sciatic nerve pain relief, we asked Jones for his favorite stretches and exercises that most commonly ease sciatica.
All or some may work for you. Try them out, performing any winners at least twice per week and as often as every day.
As always, safety is key. The exercises here may be different or more advanced than those you’ll experience in a SilverSneakers class. If you have a chronic condition, an injury, or balance issues, talk to your doctor about how you can exercise safely.
Exercise #1: Knee-to-Chest Stretch
Do 3 sets of 10- to 30-second hold per side
How to do it:
- Lie on a mat with your legs straight or knees bent and feet flat on the floor.
- Raise your right knee toward your chest, then gently grasp the back of your thigh to draw the knee even closer to your chest.
- Hold for 10 to 30 seconds.
- Release, switch legs, and repeat for a total of three sets per side.
Make it easier:
If you have trouble getting onto the floor, you can perform this lying in bed or seated in a chair.
Recommended reading: Yoga Poses for Lower Back
4 Exercises to Avoid with Sciatica (and What to Do Instead)
Exercise #2: Standing Hamstring Stretch
Do 3 sets of 10- to 30-second hold per side
How to do it:
- Place one heel on an elevated surface with your leg straight and ankle flexed.
- Keeping your back flat, hinge at your hips to lower your chest toward your leg until you feel a comfortable stretch.
- Hold for 10 to 30 seconds.
- Switch legs and repeat for a total of three sets per side.
Make it easier:
You can also do this stretch while seated in a chair. Extend your leg in front of you with your heel on the floor, and hinge from there.
Exercise #3: Pelvic Tilt
Do 3 sets of 6 to 8 reps
How to do it:
- Lie on your back with your knees bent and feet flat on the floor.
- Flatten your lower back against the floor by tightening your core muscles and bending your pelvis up slightly.
- Hold your low back to the floor for up to 10 seconds, then release. That’s one rep.
- Perform three sets of six to eight reps.
Exercise #4: Bird Dog
Do 3 sets of 6 to 8 reps per side
Subscribe to our newsletter
It's quick and easy. You could be one of the 13 million people who are eligible.
Already a member? Click to discover our 15,000+ participating locations.
Follow Us
How to do it:
- Start on all fours with your hands below your shoulders and knees below your hips.
- Engage your core, keep your spine neutral, and gaze down or slightly forward.
- Lift your left arm and extend your right leg until they are in line with the rest of your body.
- Pause, then lower back down, and repeat on the opposite side with right arm and left leg extended. That’s one rep.
- Perform six to eight reps total.
Make it easier:
If you have trouble getting onto the floor, you can perform this on a supportive bed.
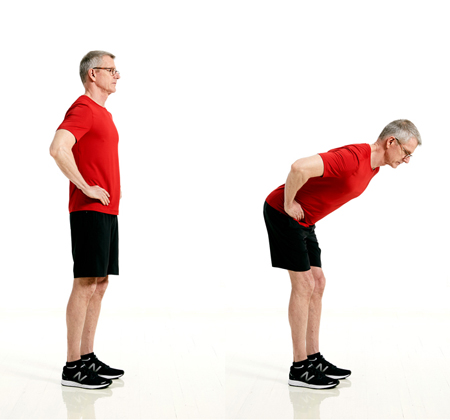
Exercise #5: Hip Hinge
Do 3 sets of 10 to 12 reps
How to do it:
- Stand with your feet hip-width apart, knees slightly bent, and hands on hips.
- Brace your core—imagine you’re about to get punched in the stomach.
- Without changing the position of your knees, bend at your hips and lower your torso until it’s almost parallel to the floor, or as far as you can comfortably go without rounding your back.
- Pause, then lift your torso back to the starting position.
- Be sure to squeeze your glutes and push your hips forward to lift your torso back to the starting position. This ensures you’re engaging your hip muscles instead of relying on your lower back. That’s one rep.
- Do three sets of 10 to 12 reps, resting for 30 to 60 seconds between sets.
Exercise #6: Glute Bridge
Do 3 sets of 10 to 12 reps
How to do it:
- Lie on your back with knees bent, feet flat on the floor about hip-width apart, and heels a few inches away from your buttocks.
- Press your arms into the floor for support, and brace your core to minimize the arch in your lower back.
- From here, push through your heels and squeeze your glutes to lift your hips up until your body forms a straight line from your knees to shoulders.
- As you get stronger, focus on getting your shins as close to vertical as you comfortably can at the top of the movement.
- Pause, then slowly lower your hips to return to starting position. That’s one rep.
- Perform three sets of eight to 10 reps, resting for 30 to 60 seconds between sets.
Make it easier:
If you have trouble getting onto the floor, you can perform this on a supportive bed.
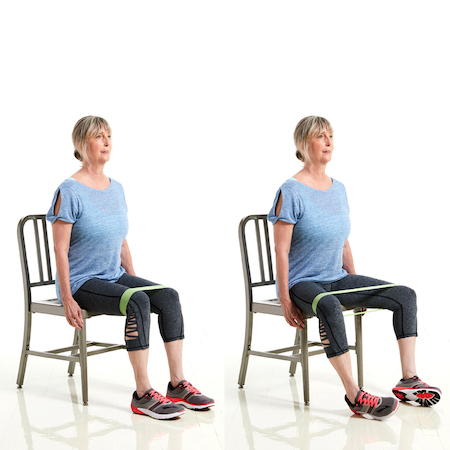
Exercise #7: Seated Band Abduction
Do 3 sets of 10 to 12 reps
How to do it:
- Sit tall in a chair with your feet about shoulder-width apart and an exercise band tied just above your knees so that the band is taut, but not stretched.
- Keeping your body stationary, push your knees out against the band as far as you can. Pause, and then release. That’s one rep.
- Perform three sets of 12 to 15 reps, resting for 30 to 60 seconds between sets.
Exercise #8: Standing Hip Extension
Do 3 sets of 10 to 12 reps per side
How to do it:
- Stand tall facing a sturdy chair, wall, or kitchen counter, holding on to it for balance.
- Keeping your back straight, brace your core, and allow both legs to bend slightly.
- From here, lift one leg straight behind you as far as you comfortably can, making sure not to further bend your knee as you do so.
- Pause, then slowly lower your leg to return to starting position. That’s one rep. Do three sets of 10 to 12 reps per side.
Make it harder:
Perform the extensions with a cable machine using very light weight.
Exercise #9: Clamshell

Do 3 sets of 10 to 12 reps
How to do it:
- Lie on one side with your legs stacked and knees bent at a 45-degree angle.
- From here, keeping your hips steady and your top foot down, lift only your top knee as high as you comfortably can. Your legs should mimic a clam opening.
- Pause, then slowly lower your knee to return to starting position. That’s one rep.
- Complete all reps, and then repeat on the opposite side.
Make it easier:
If you have trouble getting onto the floor, you can perform this lying on a supportive bed.
Make it harder:
Perform the clamshell with a small resistance band looped around your knees.
Activate Your FREE SilverSneakers Online Account
Get hundreds of free SilverSneakers On-Demand videos and stay in touch with us by creating your free online account. You don’t have to be a SilverSneakers member to get on-demand workout videos, health and fitness tips from SilverSneakers, and more.
SilverSneakers members can go to thousands of nationwide gyms and fitness locations, plus take SilverSneakers LIVE online classes led by specially trained instructors and designed for all fitness levels and abilities – at no additional cost. If you have a Medicare Advantage plan, it may include SilverSneakers. Check your eligibility here.
Already a member? Get your SilverSneakers member ID, search for locations near you, and all the health and wellness resources you need by logging in to your online member account here.