The Surprising Way Yoga Helps You Lose Belly Fat
Strength training isn’t the only exercise style that whittles our middles. Here’s how stress-reducing yoga poses can trim your waistline too.
Many of us don’t have great memories of doing abdominal exercises back in the day. Sit-ups and crunches, once the golden rule for a tighter tummy, can be backbreaking and tedious. But here’s a slim-down secret you may not have tried yet: Slow down and de-stress.
Even if you regularly work your core muscles, if your stress and anxiety levels are high, it’s likely you won’t see many belly-burning benefits from all your effort.
Chronic stress is notorious for causing excess belly fat. Research in the International Journal of Preventive Medicine notes that stress can lead to weight gain—and vice versa—which leads to a vicious cycle. Not only can stress make you reach for unhealthy foods, it also causes more fat to be stored in the abdominal region because of hormonal changes that happen when you’re feeling overwhelmed, the researchers noted.
Stress also can torpedo a good night’s sleep, which is another thing that contributes to belly fat. A 2022 study in the Journal of the American College of Cardiology showed that insufficient sleep can drive people to eat more often, which can lead to fat accumulation in the abdominal area.
Stay active, have fun, get fit — with SilverSneakers! Classes and events are happening right now at participating gyms, online through SilverSneakers LIVE, and at community centers near you. Activate your free online account to get started.
Where Yoga Fits Into the Belly Fat Equation
Stress sometimes feels inevitable, so what can you do about it? The yoga poses below will help you relax and tap into your mind-body connection. That’s their superpower!
Studies show yoga helps fight stubborn fat stores and aids weight loss. The movements themselves strengthen and tone the muscles of your core, arms, and legs — the star ingredients for belly fat reduction.
Additional research shows that yoga helps bring down levels of stress hormones and boost insulin sensitivity. Insulin sensitivity signals your body to burn food as fuel, rather than store it as fat.
Recommended reading: 8 Top Questions About Belly Fat, Answered
How to Do the Yoga Poses to Lose Belly Fat
As always, safety is key. Get your doctor’s OK before beginning a new exercise program. If you have a chronic condition (including osteoporosis and arthritis), balance issues, or injuries, talk to your doctor about how you can exercise safely.
Because these exercises are designed to reduce stress, take your time and do each one slowly rather than focusing on a specific number of seconds or minutes to hold each pose. For each, try to take several deep inhales and exhales, which is another crucial way to relax and de-stress. The movements are gentle enough to do every day.
What you need:
- Space to move
- Comfortable clothing
- Sturdy chair that does not have arm rests
- Water to sip, as needed
Pose #1: Mountain Pose
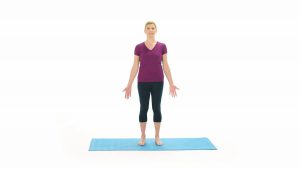
How to do it:
- Stand with your feet hip-width apart and your arms at your sides.
- Roll your shoulders up, back, and down.
- Stand tall, feeling your feet rooted to the floor. Breathe deeply for five breaths.
Pose #2: Mountain Cactus Open Arms
How to do it:
- Stand in Mountain Pose.
- Inhale, and reach your arms out and overhead.
- Exhale, and keeping your chest lifted, bring your arms out to your sides with palms facing forward and elbows bent 90 degrees like a cactus. That’s one rep. Do five reps.
Pose #3: Mountain Cactus Closed Flexion
How to do it:
- Stand in Mountain Pose with your arms out to your sides, palms facing forward, and elbows bent 90 degrees like a cactus.
- Inhale, and bring your arms together, tucking your chin to your chest and rounding your back.
- Exhale, and open your arms and chest. That’s one rep. Do five reps.
Pose #4: Seated Crescent Lunge
How to do it:
- Sit toward the edge of a sturdy chair.
- Turn your body to the left so that your left leg is forward, and your right leg is behind you.
- Place your left foot flat on the floor. Your left thigh will be on the chair.
- Extend your right leg behind you. It’s OK to bend the knee but try to have the ball of your right foot touch the floor.
- Press both feet into the ground so you feel a squeeze in your leg muscles.
- Brace your core, engaging the muscles around your belly button.
- Roll your shoulders down and squeeze your shoulder blades in.
- Keep your hands on your waist or raise them above your head as far as you comfortably can.
- Keep your head neutral and gaze forward.
- Hold for five to 10 deep breaths, or as long as you can.
- Return to start and repeat on the other side.
Pose #5: Chair Pose
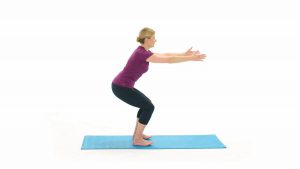
How to do it:
- Stand with your feet hip-width apart, making sure your knees and hips are facing forward. Engage your belly.
- Sit back, bending your knees and lowering your hips as if you are hovering over a chair.
- Keeping your weight in your heels, reach your arms forward for counterbalance.
- Hold here for three to five slow, deep breaths, then press through your feet to return to standing.
Form tip: Try to keep your back in one straight line throughout this pose. If your lower back starts to arch, tilt your tailbone down toward the floor. This will feel much more comfortable!
Pose #6: Modified Plank With Chair Support
Subscribe to our newsletter
It's quick and easy. You could be one of the 13 million people who are eligible.
Already a member? Click to discover our 15,000+ participating locations.
Follow Us
How to do it:
- Stand facing the back of a sturdy chair, keeping both hands on the chair.
- Step both feet as far back as you’re comfortable with.
- Hinge forward at the hips, keeping your back straight.
- Lift one arm and rotate your torso to the side. Let your gaze follow your fingertips.
- Return your hand to the chair and repeat on the opposite side. That’s 1 rep.
- Do 10 to 15 reps total.
Pose #7: Tree Pose
How to do it:
- Stand tall with your feet hip-width apart, and your toes, knees, and hips facing forward.
- Roll your shoulders up, back, and down. Draw your belly in for support and lift your chest.
- Shift your weight to your right foot. Turn your left toes slightly out, lift your heel, and draw it toward your right foot like a kickstand. Make sure not to put pressure on the ankle joint itself.
- You can bring your palms together in front of your chest or hold on to a sturdy chair for support.
- Stand tall and breathe for three to 12 breaths.
- Return to standing on both feet and repeat on the other side.
Make it harder: Place the sole of your lifted foot inside the calf or thigh of your standing leg. Make sure not to put pressure on the knee joint.
Recommended reading: Tree Pose Progressions
Pose #8: Cat Cow
Find a standing variation of the Cat Cow here.
How to do it:
- Start on all fours with your hands below shoulders and knees below hips.
- Slowly round your back up toward the ceiling (like a cat) while tucking your chin toward your tailbone.
- Then reverse the movement by arching your back (think about a cow) while lifting your hips and head.
- Do 10 reps total (five with back rounded, five with back arched).
Form tip: Focus on raising your head and tailbone to get into the cow position rather than dumping into your lower back.
Love these exercises and want more? Try SilverSneakers Yoga! Classes are offered both in-person at participating locations and online with SilverSneakers LIVE
See our sources:
Stress and belly fat connection: Current Obesity Reports and International Journal of Preventive Medicine
Sleep and belly fat connection: Journal of the American College of Cardiology
Effect of yoga on waist circumference and belly fat: Deutsches Arzteblatt International
Check Your SilverSneakers Eligibility Instantly
SilverSneakers members can go to thousands of nationwide gyms and fitness locations, plus take SilverSneakers LIVE online classes that are designed for all fitness levels and abilities. If you have a Medicare Advantage plan, it may include SilverSneakers — at no additional cost. Check your eligibility instantly here.
Already a member? Get your SilverSneakers member ID and exclusive fitness and wellness content by activating your online account here.
Not eligible for SilverSneakers? You can still get 200+ free SilverSneakers On-Demand videos and stay in touch with us by creating your online account.